A teeth shade guide is a set of tooth-coloured samples that a dental professional holds beside your teeth to name your current colour. The most common one, the VITA Classical guide, runs from A1 (light) to D4 (dark). Once your starting shade is on record, you can set a realistic target before whitening and check the change afterwards.
This guide explains how to read the codes, how the whitening-specific scales differ, what “how many shades whiter” really means, and how to choose a result that still looks like you.
TL;DR
- A shade guide gives your tooth colour a code. The classic scale is A1 to D4, grouped by colour family (A, B, C, D), with a higher number meaning a darker, more intense tooth.
- Whitening-specific guides add extra, lighter tabs (often labelled BL1, BL2 and so on) so that results beyond A1 can be measured.
- Results vary from person to person. Australian dental bodies describe outcomes as unpredictable, from subtle to dramatic, and sometimes no change at all.
- Whitening only lightens natural enamel. Crowns, veneers and fillings will not change colour.
- Your target should suit your eyes, skin tone and the rest of your teeth, not simply be the lightest tab on the chart.
Table of Contents
- What a teeth shade guide actually is
- How the A1 to D4 system works
- Hue, chroma and value: why the numbers can mislead
- Whitening shade guides and the BL tabs
- How many shades whiter can teeth go?
- What whitening cannot change
- How to read your own shade (and why lighting matters)
- Choosing a target shade that looks natural
- How often should you repeat whitening?
- Whitening with Smilebar
- FAQ
What a teeth shade guide actually is
Dentists, lab technicians and whitening clinics all face the same problem: colour is hard to describe in words. “A bit yellow” means different things to different people, and it is useless to a lab making a crown. A shade guide solves this with a fan or ring of small tabs, each made to a standard colour, each with a code.
To take your shade, the clinician holds the tabs beside your natural teeth and finds the closest match. The code is then written in your notes. That gives everybody a shared language for three jobs:
- Whitening: recording where you started and where you want to end up.
- Restorations: matching crowns, veneers or bonding to the neighbouring teeth.
- Progress checks: comparing before and after, rather than relying on memory or a flattering photo.
It is still a visual method. Two people can pick slightly different tabs for the same tooth, which is why clinics try to be consistent about how and when they take the reading. More on that below.
How the A1 to D4 system works
The VITA Classical shade guide is the one most Australians will meet. It has 16 tabs, sorted into four letter groups. According to the manufacturer’s own shade-determination material, the groups describe the dominant tint of the tooth:
| Group | Tint | Shades |
|---|---|---|
| A | Reddish-brownish | A1, A2, A3, A3.5, A4 |
| B | Reddish-yellowish | B1, B2, B3, B4 |
| C | Greyish | C1, C2, C3, C4 |
| D | Reddish-grey | D2, D3, D4 |
Within each letter, the number shows how strong the colour is. A1 is paler and less saturated than A4. B1 is paler than B4. So “Is A1 or B1 whiter?” is a fair question: both are at the light end of their families, and B1 is generally regarded as the lightest of the 16 standard tabs, with A1 close behind. The difference between them is mostly one of tint rather than a big jump in brightness.
A few practical points about the letters:
- A shades are the most common family in adults, and many natural smiles sit somewhere between A2 and A3.
- B shades lean yellow and often look bright and clean at the lighter numbers.
- C shades have a grey cast. They can look dull even when they are not especially dark.
- D shades are reddish-grey and uncommon in the lighter range.
The letters and numbers are labels, not a ranking from “bad” to “good”. A well-matched A2 can look far more attractive on a person than an overly bright tab that clashes with their features.
Hue, chroma and value: why the numbers can mislead
Colour scientists describe tooth colour using three ingredients. Hue is the actual colour family, chroma is how intense that colour is, and value is how light or dark the tooth is on a scale from black to white. The American College of Prosthodontists uses this framework when it discusses shade matching.
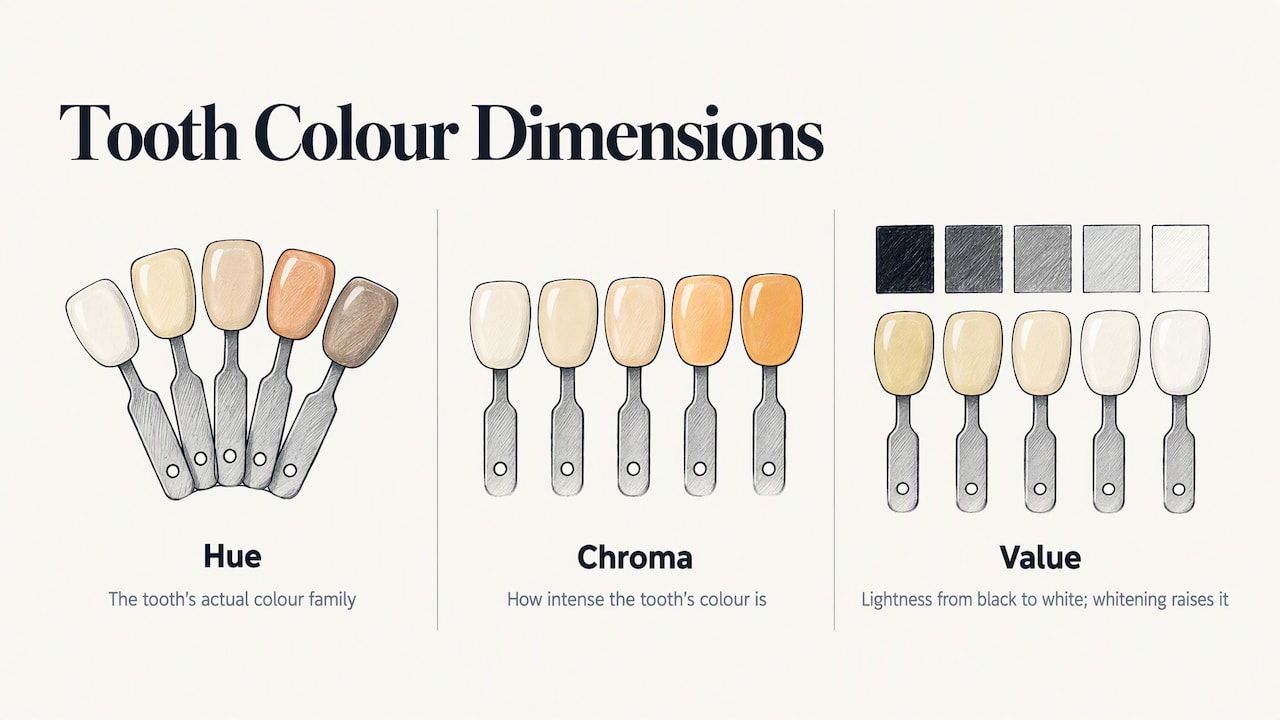
For whitening, value matters most. A tooth that gets lighter has gained value. The trouble is that the classic A1 to D4 tabs were never arranged in a neat light-to-dark line. The 16-tab guide dates back to the 1920s and was designed to help select denture teeth, not to measure whitening. Its tabs are unevenly spaced, so the step from one tab to the next is not always the same size. That makes “I moved three shades” a looser statement than it sounds.
To get around this, clinicians often re-order the tabs by brightness. A widely used approach arranges the classic tabs from lightest to darkest by value, running roughly from B1 through to C4, and counts how many positions a tooth moves. Researchers refer to one step along that ordered scale as one shade guide unit.
The takeaway: a shade code is useful, but the number of “shades” gained depends on which scale is being used and how it is ordered. When a clinic quotes a figure, ask which guide they measure against.
Whitening shade guides and the BL tabs
The classic guide has a ceiling. Many people who whiten professionally end up lighter than A1 or B1, and then there is nothing left on the chart to describe them. That is the reason bleach-specific guides exist.
The VITA range includes bleached shades labelled 0M1, 0M2 and 0M3, available as an add-on to the Classical guide. There is also a dedicated whitening guide that arranges its tabs by brightness and lines up with 29 brightness levels used in American dental practice. Its numbered units make it easier to record shade change during whitening, agree on a goal beforehand and check the outcome afterwards.
What do BL1 and BL2 mean?
You will often see labels such as BL1, BL2, BL3 and BL4 on bleaching tabs. They sit at the very light end, beyond the natural shades. BL1 is the lightest of the group and BL2 is a step softer, with the numbers climbing as the tabs get less white. In everyday terms, BL1 is a very bright, stark white, and BL2 is still very white but slightly less so.
Exact tab names differ by manufacturer, so treat any BL code as belonging to the guide it came from. Ask your clinician which guide they use before comparing numbers with a friend’s result or something you read online.
How many shades whiter can teeth go?
This is the question most readers really want answered, and the honest answer is: it depends.
The Australian Dental Association’s NSW branch advises that whitening outcomes are unpredictable. Results can be subtle or dramatic, can be uneven, and in some cases there is no change at all. The Australian Dental Association’s national policy also stresses that people should go in with realistic expectations.
That said, most people notice a clear lift when the treatment is done well. What shapes your own number:
- Starting colour and tint. Yellowish teeth generally respond better than greyish ones. Grey cast (the C group) can be more stubborn.
- Cause of the discolouration. Surface stains from coffee, tea and red wine tend to lift more readily than deeper discolouration inside the tooth. Some causes, such as fluorosis or certain medication-related staining, need more than bleaching alone. See our explainer on fluorosis and teeth whitening.
- Enamel thickness and translucency. Thinner, more translucent enamel can show the darker layer beneath.
- Strength and technique. Higher-strength gel applied by a registered dental practitioner or under a proper protocol generally does more than low-strength home products. In Australia, hydrogen peroxide above 6% (or carbamide peroxide above 18%) is restricted under the Poisons Standard to registered dental practitioners.
- Aftercare. New stains settle faster if you drink dark liquids straight after treatment. We cover this in what to eat after teeth whitening and what to avoid.
So instead of promising “X shades”, a sensible clinic will take your starting shade, explain the likely range, and tell you if your teeth are unlikely to reach your goal.
A simple worked example
Say your starting shade is A3, a very common adult colour. A visible improvement might take you to A2 or A1. If you were measured on the brightness-ordered scale, that could be several positions along the line, because A3 sits well down from B1. Someone starting at C3, on the other hand, may gain less brightness for the same treatment. These are illustrations of how the scales work, not promises. Your own result depends on the factors above.
What whitening cannot change
A shade guide also helps you spot problems before you spend money. Whitening agents such as hydrogen and carbamide peroxide lighten natural enamel. According to Healthdirect, they do not work on crowns, veneers or fillings.
That has real consequences for your smile:
- If you have a crown on a front tooth, it will stay the same colour while the teeth around it lighten. A mismatch can appear.
- Fillings and bonding can look darker than the surrounding teeth after whitening, and may need replacing to match.
- A single darker tooth that has had root canal treatment is a different case. It can sometimes be lightened from the inside. Read about dead tooth whitening before crowns are considered.
The practical rule is to whiten first, wait for the colour to settle, then have any cosmetic work matched to your new shade. Doing it in the other order means restorations are matched to a colour you are about to leave behind.
Before any whitening, a proper check of your teeth and gums is sensible. The Australian Dental Association says a comprehensive dental examination is needed to diagnose and treat oral health problems and to reduce the risk of discomfort from bleaching agents. If you have active decay, gum disease, cracked teeth or exposed roots, treat those first.
How to read your own shade (and why lighting matters)
You can get a rough idea of your shade at home, but a clinic reading is more reliable. Visual shade matching is subjective. Experience, tired eyes and poor lighting all change what the observer sees. The American College of Prosthodontists recommends lighting with a colour temperature between 5500K and 6500K and a Colour Rendering Index above 90.
A few habits that keep readings fair:
- Take the shade early. Teeth dry out during a long appointment and look lighter and chalkier. Reading at the start avoids that.
- Use consistent light. Natural daylight or a proper colour-corrected light beats a yellow bathroom bulb.
- Remove distractions. Bright lipstick, a vivid top or a coloured bib can skew your perception.
- Squint or glance briefly. Looking too long tires the eye. A quick glance gives a better match.
- Compare to the right tooth. The canine often appears more saturated than the front teeth. The central incisors are the usual reference.
If you are curious about gentler, non-clinical approaches to staining, this overview of natural teeth whitening options is worth a read before you decide whether professional treatment is what you need.
Choosing a target shade that looks natural
The lightest tab is not automatically the best choice. A smile that is far lighter than your eyes can look false. A general guideline discussed in Australian consumer advice from CHOICE is that teeth should not look whiter than the whites of your eyes if you want a natural result.
Use these questions to set a target:
- What is your skin tone? Warmer or olive skin often suits slightly warmer whites. Deeper skin tones can carry brighter whites well, though very opaque, flat white can still look artificial.
- What is your age? Teeth naturally darken over time. A shade that looks natural at 25 can look stark at 60.
- What is your event? For a wedding or a big presentation, aim for fresh and healthy. Photographs under flash and bright lighting make teeth look lighter, so you rarely need to go to the maximum.
- What do you have in your mouth? Existing crowns or veneers set a practical limit. Pick a target that your restorations can live with.
- What will you maintain? A very white result takes more effort to keep up than a moderate one, particularly if you love coffee or red wine.
A good consultation should leave you with a named starting shade, a named realistic target, and a clear explanation of how the two are measured.
How often should you repeat whitening?
There is no reason to chase the top of the scale every few weeks. Repeating treatments too often can irritate gums and increase sensitivity. Our guides on how often to whiten teeth and on why monthly repeat treatments raise irritation risk walk through sensible spacing. If you are pregnant or thinking about whitening for a child, read our pages on pregnancy and whitening and whitening children’s teeth first.
Whitening with Smilebar
Smilebar has performed more than 10,000 whitening procedures since 2011, and every treatment starts with a consultation so the plan fits your teeth and your goal. Treatments use the highest-grade whitening gel allowed by law, with a focus on keeping sensitivity low.
There are two session options:
- Triple Action, 60 minutes: $199.
- Ultra Bright, 90 minutes: $249.
Gift vouchers are also available if you want to give someone a whiter smile. If you would like to know your starting shade and what is realistic for you, book a session or buy a voucher at Smilebar. You can see how the appointment runs on our treatment steps page.
If you are short on time, our guide to lunch break teeth whitening shows what fits into 60 to 90 minutes, and our key facts before your first treatment covers what to prepare.
FAQ
What is the whitest natural tooth shade?
On the classic A1 to D4 guide, B1 and A1 are at the light end, and B1 is generally regarded as the lightest standard tab. Few people have teeth that light naturally. Whitening guides add extra bleach tabs beyond this range, but those describe a treated, very bright result rather than a typical natural tooth.
What is the difference between BL1 and BL2?
Both are bleach shades that sit beyond the natural range. BL1 is the lightest and brightest, while BL2 is slightly softer. Tab names vary by manufacturer, so confirm which guide your clinician uses before comparing codes.
How many shades whiter will my teeth get?
Nobody can promise a number. Australian dental bodies say results can range from subtle to dramatic, and some people see no change. Your starting colour, the cause of the staining, your enamel and the treatment all play a part, and the count also depends on which shade scale is used.
Will whitening change the colour of my crowns or fillings?
No. Whitening works on natural enamel, so crowns, veneers and fillings stay the same colour. If you have visible restorations, mention them at your consultation so the target shade can allow for them.
Is a shade guide the same as a whitening shade guide?
Not quite. A standard guide such as A1 to D4 describes the colour of natural teeth and is used for restorations as well as whitening. A whitening guide adds lighter tabs and often arranges them by brightness, so progress during whitening is easier to record.
Recommended
- How Often to Whiten Teeth: A Practical Guide for Australians
- All You Should Know About Teeth Whitening Procedure
- Teeth Whitening Maintenance: How to Keep Your Results
- Dead Tooth Whitening in Australia: Internal Bleaching Before Crowns